ACE, the Pedagogica Development Subsystem
ACE (Activity Contruction Environment) is the default development tool for Pedagogica model based activities. ACE provides a combination of visual and script authoring for the activity developer.
For a comprehensive reference document on ACE, go to the ACE Reference Manual
Models Usable by Pedagogica
The following discussion assumes the reader has some familiarity the Java language and the notion of Object Oriented Programming and Design Patterns.
One of the goals of Pedagogica is to make it easy to develop activities based on interactive computer models. The first such interactive computer model used to develop Pedagogica activities was Biologica. Because it was developed in the object-oriented language Java, it made extensive use of object oriented design patterns, in particular the Model-View (or Model-View-Controller) design pattern. In this design pattern the Model encapsulates the primary state, while the multiple Views show visual representions of that state and provide visual affordances for manipulating the Model state. A fundamental characteristic of a Model is that it has no knowledge of its Views. All interactions with the Views are carried out through Event-Listener mechanisms. A View registers itself with a Model using a method on the Model (usually of the form add<Event name>Listener(<Event name>Listener)). When event <Event name> occurs in the Model, the Model then calls one of the appropriate methods on the <Event name>Listener interface for each instance that has been registered by one of the Views. While Models know nothing of the Views, the Views must have complete knowledge of the Model's interface. That way the visual affordances provided by a View can directly or indirectly control the Model's state.
Use of this design pattern enables Pedagogica to seamlessly insert scripted activity control over the View and Model components. The Pedagogica activity scripts can register for Model generated events in exactly the same way as the native Views do. The activity can also integrate the Views with other UI components to provide alternative controls for the Model, in effect creating an activity specific, scaffolded interface for the Model. It is also useful if the various Views, to the extent that they have their own controls, make methods available to effect the visibility and enabling of those controls.
The main underlying assumption is that all of the above Model and View components are written in Java. It is further encouraged that the the View components be derived from javax.swing.JComponent or javax.swing.JPanel, so that they can be easily used in a Java applications (as opposed to being derived from java.awt.Applet or any of the window classes such as java.awt.Frame or javax.swing.JFrame). The reason for this is the Pedagogica activity usually runs a a stand-alone Java application in a single window. Also, to use a View in the Pedagogica tool's visual NodeViewEditor, the View must have a public no-argument constructor.
The current hope is that any Java programmer following the fairly simple guidelines listed above can create Views and Models that can be easliy used in Pedagogica activities. The JavaDoc documentation generated from both the Views and the Models should be enough for the activity developer to use them in an activity.
Pedagogica Run Time Structure
The Pedagogica run time model supports a general mathematical graph structure consisting of nodes connected by directed arcs (to use one form of mathematical graph terminology). It could also be called a map (like a concept map) or network. This structure was chosen because it is very general and flexible, and gives the developer powerful tools for organizing the scripts and components used to develop the activities. Pedagogica implements a runtime semantics on this graph structure that assigns to nodes the role holding activity state, and to arcs the role of managing the transition between the states. In addition, this semantics provides for predefined functions in nodes and arcs that support each of these roles.
The node from which an arc originates is the source and the the node to which the arc terminates is the sink.
Node Functions
- first() - Called the first time a node is entered
- enter() - Called each time the node is entered.
- view() - Called after the view has been prepared. If you are familiar with Java GUI programing, this is at the end of the addNotify on the view frame.
- exit() - Called just before the current node is exited
Arc Functions
- activate() - Called when the source node of this arc is entered
- deactivate() - Called after the source node has been exited and before the enter method of the sink node of the arc is called
- test() - Called after the view has been prepared. If you are familiar with java gui programing, this is at the end of the addNotify on the view frame.
- traverse() - Called while moving from arc source to arc sink.
Arc Traversal Sequence
- exit is called on the source node
- deactivate is called on all arcs originating from the source node. including the one being traversed.
- traverse is called on the arc
- enter is called on the sink node
- activate is called on all the arcs originating from the sink node
Variables
These are global variables that are available to the node script during all the functions calls.
- currentNode - The node object containing this script.
- nodeScript - The script object.
These are global variables that are available to the arc script during all the functions calls.
- incomingArc - The arc object that contains the current arc script
- arcScript - The arc script itself
Scripting in Pedagogica
The developer of a Pedagogica activity at this time must be familiar with the JavaScript language (particularly, the Rhino implemention of the language, which is itself written in Java). In the future, the development and runtime environments of Pedagogica will allow the use of multiple scripting languages (such as Bean Shell and Groovy) by using a scripting framework such as BSF (Bean Scripting Framework) or JSR 223. For now, however, all scripting is done exclusively with JavaScript. Go to http://www.mozilla.org/rhino/ for the specifics on the Rhino implementation. For a comprhensive source of information about the JavaScript language, we recommend JavaScript: The Definitive Guide by David Flanagan, published by O'Reilly.
Event Handling in JavaScript
One particularly useful feature of most scripting languages that can call into Java is the ability to implement a Java interface with script code. This is especially useful when creating event handlers in the script. Below is an example of how to create such a handler for ActionEvent (using ActionListener interface) in JavaScript (Rhino implementation).
var actionHandler =
{
    actionPerformed: function(event)
    {
       System.out.println("Action performed!");
    }
};
var actionListener = new ActionListener(actionHandler);
The object referenced by the actionListener variable is an actual instance of a Java class that implements the ActionListener interface. Thus, that object can be passed as an argument to any Java method that requires an ActionListener instance as a parameter, such as javax.swing.JButton.addActionListener. This kind of technique is used extensively in Pedagogica activities that handle events from components, which is almost all of them.
Using ACE to Create an Activity - Step by Step
First Activity - Hello, World!
For our first activity we'll create the canonical Hello, World! script. We'll do this in two stages. First, we'll create the minimal text version, then we'll create a more elaborate (and interesting) version that uses several important features of ACE.
Starting ACE
The easiest way to start ACE is via a WebStart link. Here is a link to the latest released version of ACE. Just click on it to start ACE on your machine. After the necessary files are downloaded, you should see this:
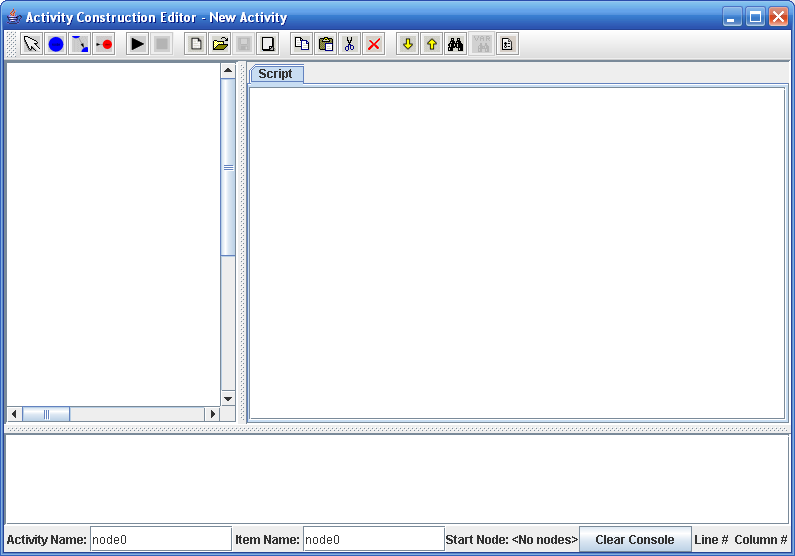
(Note: These are screen shots from a machine running Windows XP. While ACE runs on all platforms that support Java, the actual appearance will vary slightly between platforms.)
As you can see there are three main regions in this view. The one on the right is the area we'll be using first. This is where the JavaScript code resides. The region on the left contain the graphical view of the nodes and arcs mentioned earlier. It is empty now, because there are no arcs and only the root node exists, which is never visible in this area. The bottom area is a console where any output text from the running activity will appear.
First Line of JavaSCript
Now let's create our first script. Select and copy the line below. Then click into the script area in ACE and type Control-V. This should paste the line into the text area.
java.lang.System.out.println("Hello, World!");
Click on the Run button  to start the activity. Since you haven't saved this activity, ACE will now bring up a file chooser to allow you to do so. Let's call this activity HelloWorld.jar and save it in the default directory. After the activity runs the words Hello, World! will appear in the console area of ACE.
A Fancier Hello, World!
Let's make this activity a bit more interesting. Consider creating a button that is labelled "Click here to say Hello, World!" and making the activity put a picture and the words "Hello, World! in the window, replacing the button after it is clicked.
Go back to the original HelloWorld.jar activity. You can leave the original script line or delete it, as you choose. It won't have any effect on what we are going to do now.
Here is the sequence of actions we will take for the new version of the activity.
- Create a new node for the initial state with just the button showing.
- Create a second node for the state after the button is clicked.
- Name the new nodes, and the root node as well.
- Add a button to the view of the first node.
- Add a picture and label to the view of the second node.
- Import an image file as a resource for the picture
- Create and arc connecting the first node to the second node.
- Script the arc to handle the button.
- Write script code to set up the picture and label in the second node.
- Save and run the activity.
Creating Nodes
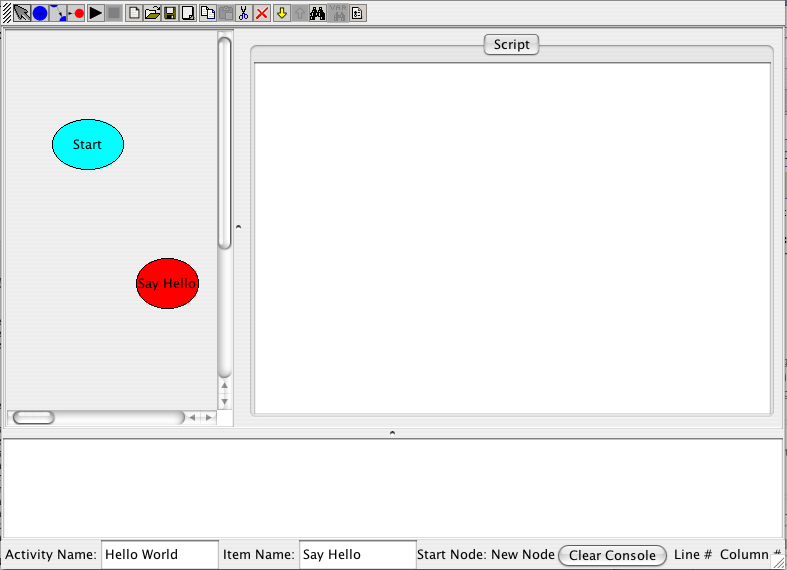
A new node can be created by clicking once on the Create Node button  in the button bar, then clicking into the activity view area on the left. A node should appear labeled "New Node". Create a second node the same way. Notice that clicking on the nodes with the mouse causes them to change color. This other color (red, in this case) indicates that the node is selected. You can't tell yet because there is no script code (except for the first line we wrote, maybe), but selecting a node will change what appears in the script area on the right. Furthermore, the second status field labeled "item name" will also change. You can change the activity name by entering text in the field next to "Activity Name" (and use the Enter key when done) and similarly the selected node's name can be changed in the item name field. Below, the first node name has been changed to Start, the second node to Say Hello and the activity name to Hello World.
Now we have completed steps 1-3 in the sequence listed above. Next we will start adding components to the node view of each node.
Node View Editing
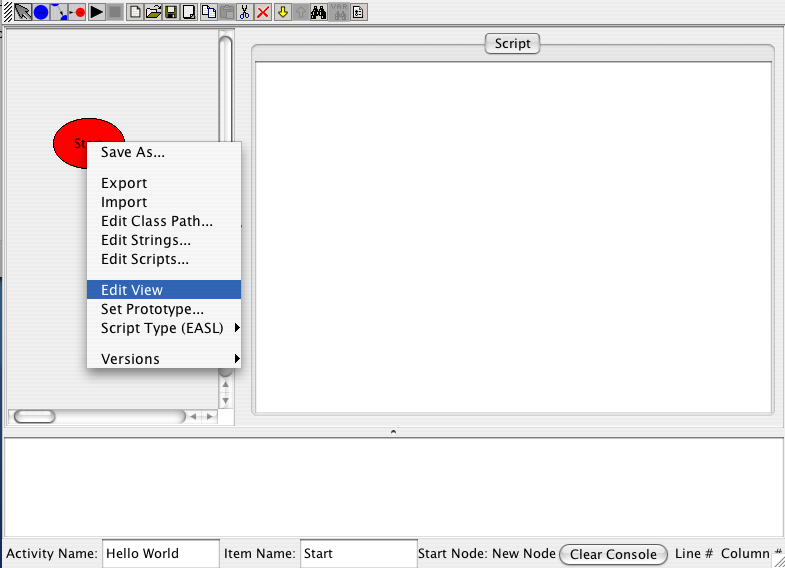
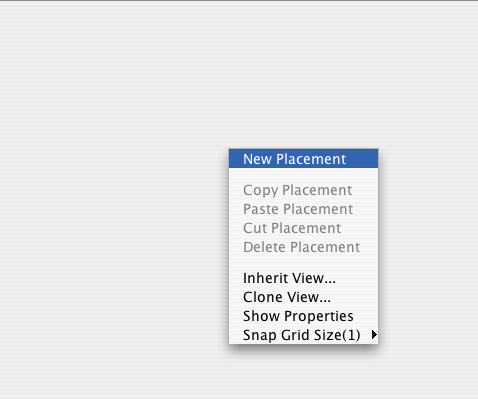
To start editing the node view first bring up the node view editor. This is done by right-clicking on the appropriate node. On the popup menu select Edit View:
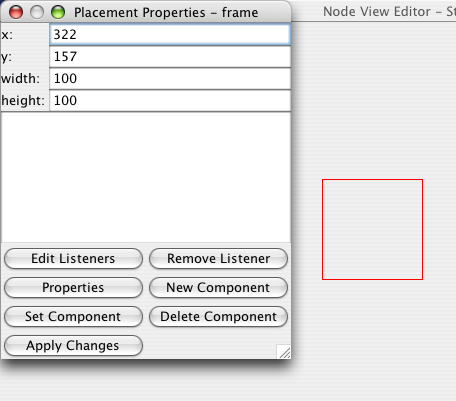
Then when the node view editor appears, right-click again to get its popup menu, and from that select New Placement:

A red square representing the placement, and a property dialog will appear. At this point, we haven't created any components yet, so the component list in the middle of the dialog will be empty.
Now, with new placement selected click on the New Component button in the dialog. This will create a JButton by default and assign it to the new placement.

The name of component can be used in any Pedagogica script as a variable with the component (as a Java object) as a value. Note that the default name is not very memory-friendly, so it can be changed to something like, in this case, helloButton.
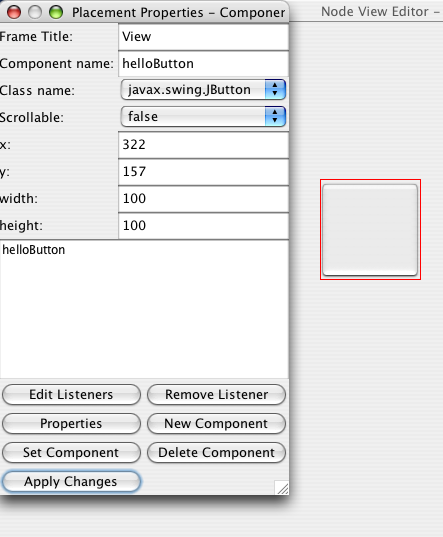
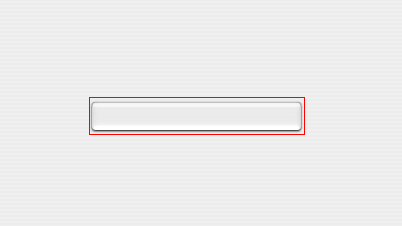
Once the component has been assigned to a placement, the placement can be sized and positioned appropriately. Click the mouse just inside the red border of selected placement (within five pixels or less) and you can drag to resize the rectangle, which will determine the size of the component in the view at run time. If you click nearer to the center (beyond the five pixel border detection) you can drag the rectangle to whatever position is desired. In this case, we exended the width and reduced the height and placed it approximately in the center.
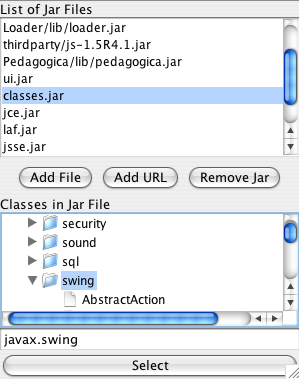
Closing the node view editor, we next select the Say Hello node and open the view editor on that. This is the view where two labels will be created, one containing the image and one containing the text. Duplicating what was just done to place the button in the previous view, we now add the two labels. However, since the default class of a new component is a JButton, the class of these new components will have to be changed to JLabel.
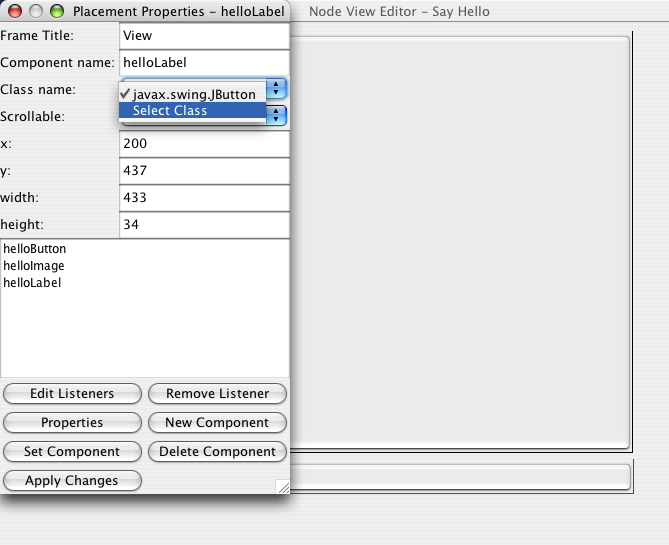
A class selection dialog appears to allow specification of the component class.
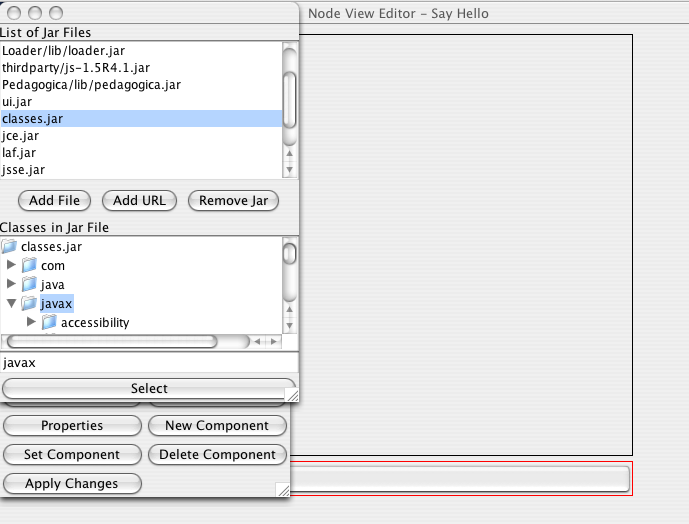
The classes can be found by navigating a tree comprised of package and class names extracted from a list of jar files. Selecting a jar file will open the tree of classes associated with that jar file. In this case, under MacOSX, the jar file containing the Swing components is classes.jar, while on Windows it would be rt.jar.
And continuing to browse the class tree in the select class dialog:
 and then
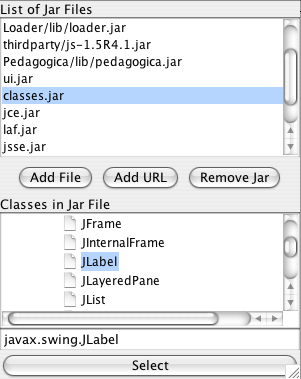
Clicking on the Select button will select the class for the component.
Creating an Arc
After the above dialog is closed, we'll create the arc that connects the Start node to the Say Hello node. The Create Arc Item button  will load the cursor with the arc creation function. In this mode, clicking the left mouse button the first time will place the source point of the arc and the second click will place the sink point. When the source and sink points a placed over existing nodes, the arc will link those two nodes. Clicking on the arrow triangle of the arc will select the arc and show the arc script in the script area to the right.
The Script Code
Let's continue and click in the background of the activty view. This selects the root node, and text entered in the area on the right will be interpreted as the root script. Any variables defined here in the outermost lexical scope wil be global to the entire activity, including any nodes and arcs at any sub-level. Without intending to recommend the extensive use of global variables as a programming technique, we want to make sure that the developer understands that they are available in this way if considered necessary.

Here, for the readers convenience, is the text version of the script that appears in the previous image.
// This is the root node script. All other nodes are direct or
// indirect sub-nodes of the root node.

// This is the path to the image once it has been imported
// into the HelloWorld activity. This variable is directly
// accessible to sub-node scripts, but when assigned a value
// from a sub-node, the form root.imagePath = somevalue would
// have to be used.

var imagePath = "Resources/sun.gif";

// This is a global variable that can be used by the arc scripts
// to determine which button can cause a state transition by being
// clicked.
var actionObject = helloButton;
If no other nodes are created, then just the script in the in the root node will be executed. If any other nodes are created, then the first one created will be automatically set to be the start node. If another node needs to be set to be the start node then the Set Start Node button  will make a selected node the start node.
In this start node, the only thing that needs to be done is the text property of the helloButton is set. This is done in the enter function of the node, which will get called by the Pedagogica run-time during the transition between the root node and the start node.

function enter()
{
	// Set the button text
	helloButton.setText("Click here to say hello");
}
In the Say Hello node the helloLabel text is set and the helloImage is set from a constructed ImageIcon object (since the setIcon method of the JLabel class requires an Image value).

function enter()
{
	// Set the label text
	helloLabel.setText("Hello, World!");

	// Set the label icon from the URL of the imported image file.
	// currentNode.getResource always returns a URL if the file
	// has been imported into the activity
	var imageIcon = new ImageIcon(currentNode.getResource(imagePath));
	helloImage.setIcon(imageIcon);
}
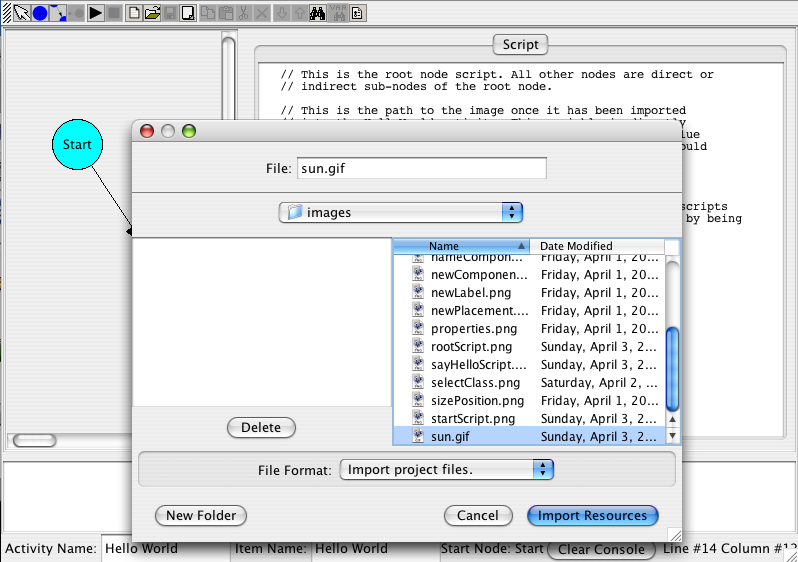
The ImageIcon takes a URL as a constructor argument, with the assumption that the URL refers to some image resource (JPEG, PNG or GIF). In this situation, it is a GIF file (sun.gif) that was imported into the activity. This import was done using the Import command on the activity area popup menu. The resulting import dialog allows the opportunity to select resources from the local file system and have them included in the Resources 'folder' of the activity archive (jar) file.
The arc script will control the transition between the Start node and the Say Hello node. The button placed in the Start node view is the component whose action (clicking) will initiate the transition. This means in practice that an ActionListener instance must be applied to the button somehow. Below is the script that accomplishes this in this arc. The test function is another (like enter) that is called by the Pedagogica run-time, in this case, when the currentNode.next() is called somewhere in the activity script. Notice that the listener is added in the activate function and removed in the deactivate function of the arc script. The activate function is called when the source node of the arc is entered, and the deactivate is called when the source node is exited. In this activity, the actionObject is set as a global (root node) variable to be the helloButton.
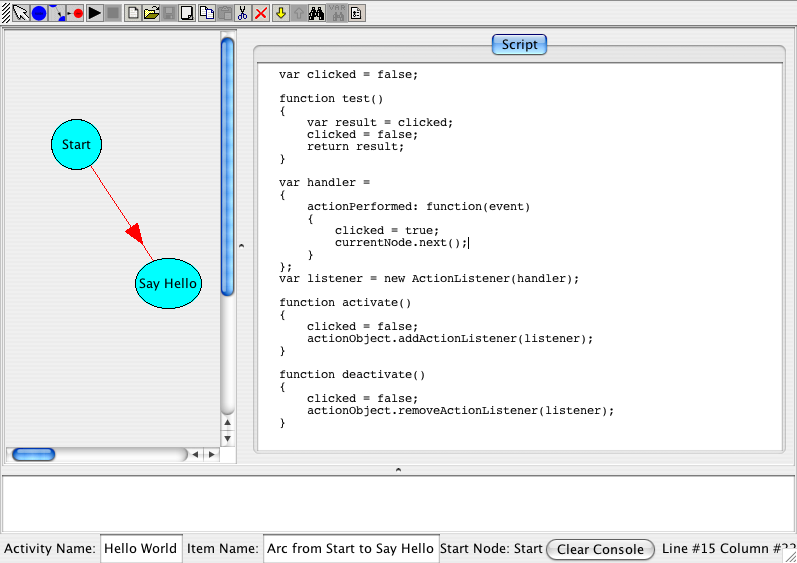
var clicked = false;

function test()
{
	var result = clicked;
	clicked = false;
	return result;
}

var handler =
{
	actionPerformed: function(event)
	{
		clicked = true;
		currentNode.next();
	}
};
var listener = new ActionListener(handler);

function activate()
{
	clicked = false;
	actionObject.addActionListener(listener);
}

function deactivate()
{
	clicked = false;
	actionObject.removeActionListener(listener);
}
Run the Activity - Oops!
Remembering how we ran the activity before (using the run button), let's try again now with this more elaborate version. If everything goes as expected, when the activity starts we should see a window with a button in the middle that says "Click here to say hello". However, when the button is clicked the view doesn't change. If you move the activity window aside, you'll notice an error message in the ACE console. This indicates that something went wrong during the activity execution.
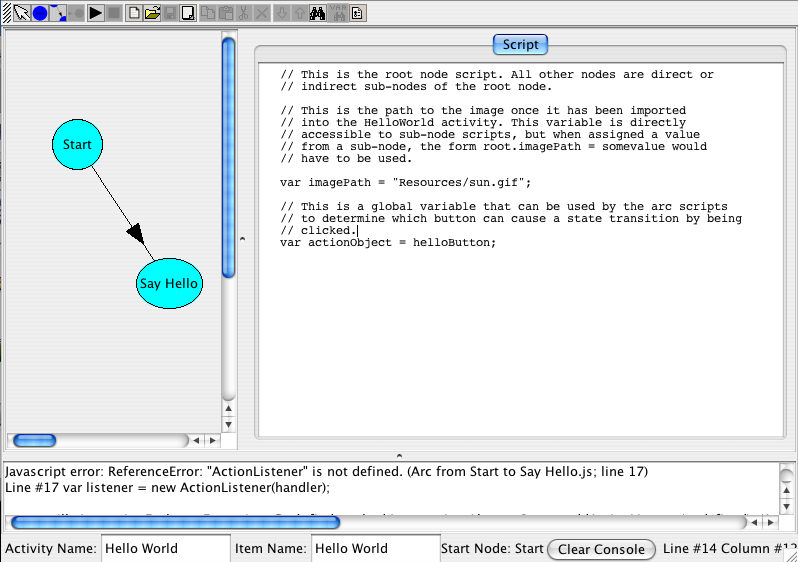
It looks like there is a problem with ActionListener. The script doesn't know what it is. There is one more thing we have to do to get this to work. The complete name of the class ActionListener is java.awt.event.ActionListener and in order for JavaScript to recognize ActionListener as being this class, it must be imported. This is accomplished by using the Edit Class Path... command and dialog.
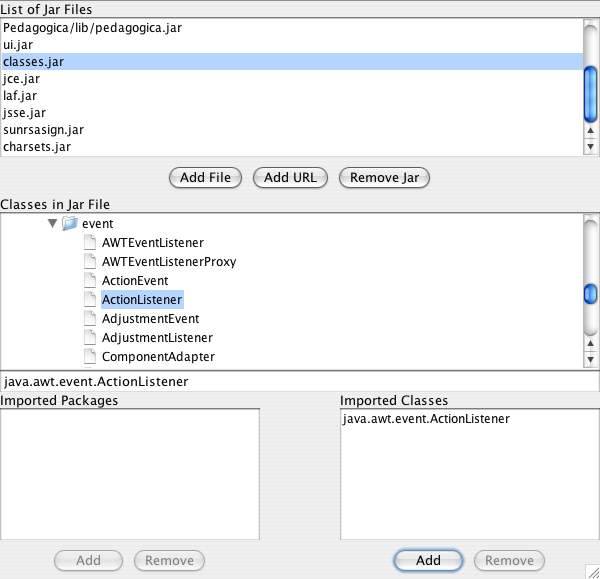
The above dialog, in addition to allowing the import of classes, also provides a way to add new jar files (and thus, whole new sets of Java classes) to the run-time environment of the activity. In this case, the classes we need are included in the installed Java run-time, so no new jar files need to be added. In addition to ActionListener, we also need to import ImageIcon, which has the full name of javax.swing.ImageIcon in the same jar file with ActionListener. Once the imports for these two classes are added the Hello World activity should run correctly.